
Real projects, as they happen
Ponte Design is a new studio, so there's no gallery of finished yards here yet, and we won't fill it with someone else's. Real client projects will appear here as they're completed, with each homeowner's permission. Until then, here's how a design comes together.
The sample planting plan
Tap any plant on the plan, or any row in the schedule, to see what it is, how much water it needs, and when it looks its best.
Sample plan — illustration, not a client project
Yankee Point ceanothus
Ceanothus thyrsiflorus var. griseus 'Yankee Point'
- Water use
- Low
- Season
- Blue flowers Mar–Apr; no summer water once established
- Spread
- About 8 ft
- Height
- About 2.6 ft
- On plan
- 6 shown
Tap any plant on the plan, or any row in the schedule.Tap any plant on the plan.
- Flagstone patio, walk, porch and steppers
- Decomposed granite paths
- Gravel garden, 3/8 in gravel
- Gravel mulch by the house, service side
- Dry creek and rain garden, river cobble
- Corten raised beds
- Planting beds, mulched
- Sedge parkway, no mow
- Existing concrete: drive, walk, curb
- Existing oak, dripline protected
- Buried drain pipe and overflow trench
- The whole lot, seen from above: the back yard at the top, the house, both side yards, the front yard, the parkway and the street.
- Each circle is a plant, drawn at about the size it grows to, in its leaf color; the small dots are its flowers or berries.
- The code beside each plant matches a row in the plant schedule.
- A dashed circle marks the existing oak’s dripline, kept and protected. The front tree is drawn see-through, so the plants under it show.
- Patterns show the surfaces: flagstone, decomposed granite, the gravel garden, gravel mulch by the house, river cobble, corten, the sedge parkway, and the existing concrete.
- Dashed lines are buried: the drain pipe from the rain chain to the creek, and the overflow trench. The dashed line around the house is the roof edge.
| Symbol | Code | Plant | Water | Season | Qty |
|---|---|---|---|---|---|
| QUA | Very low | Evergreen; catkins in spring | 1 | ||
| CRH | Low | Blue flowers Mar–Apr; evergreen; limbed up to 6 ft | 1 | ||
| ARM | Low | Evergreen; rose flowers Oct–Mar, red fruit Nov–Feb | 1 | ||
| MAL | Moderate | Blossom Mar–Apr; fruit Aug–Oct (Gala, Golden Delicious, then Fuji); three cultivars so they cross-pollinate | 3 | ||
| HET | Low | White flowers Jun–Jul; red berries Nov–Jan; unclipped screen, 8–10 ft | 5 | ||
| FRC | Low | Evergreen; berries Aug–Oct, red turning black | 6 | ||
| RIS | Low | Pink flowers Jan–Mar; deciduous | 3 | ||
| CEY | Low | Blue flowers Mar–Apr; no summer water once established | 6 | ||
| ERF | Very low | White-pink flowers May–Sep; rust seed heads Oct–Dec | 3 | ||
| EPC | Low | Scarlet flowers Aug–Oct; hummingbirds | 14 | ||
| IRD | Low | Lavender-blue flowers Mar–May; evergreen clumps, part shade | 7 | ||
| MON | Low | Lavender flowers Jun–Aug; aromatic, a bee plant | 9 | ||
| PEM | Low | Blue-violet flowers Apr–Jul | 22 | ||
| HEM | Low | Pale pink flowers Mar–May; evergreen, takes shade | 24 | ||
| SIB | Low | Blue flowers Mar–May; summer dormant | 53 | ||
| ESC | Very low | Orange flowers Mar–Jun; plugs to start, then sown in fall; reseeds | 22 | ||
| MUR | Low | Tan plumes Jun–Sep | 7 | ||
| FEC | Low | Blue-green tufts; flower stems in May | 27 | ||
| CXP | Low | No-mow parkway; green most of the year, tan in drought | 315 | ||
| STP | Very low | Purple-tinged seed heads Apr–Jun, then summer gold | 31 | ||
| COF | Low | Lavender daisies Jul–Oct; silver foliage | 10 | ||
| DUB | Very low | Chalk-white rosette; red-orange flower stems Apr–Jul | 8 |
Use the arrow keys to move between plants, then press Enter to show that plant’s details.
The same plan, built in 3D
We built the sample plan above as a 3D model straight from its data, so every plant, stone, light and path sits where the plan puts it. A finishing pass then adds the light and detail of a photograph. It’s the whole path from a plan to a picture of it.
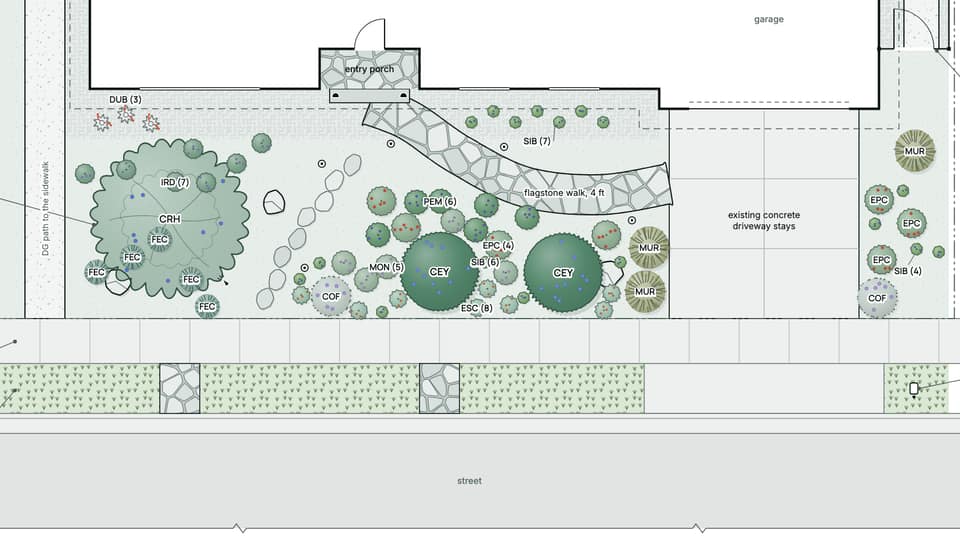 1
1The plan
Every plant, path and light, drawn to scale. This is the front yard of the sample plan.
Sample plan — illustration, not a client project 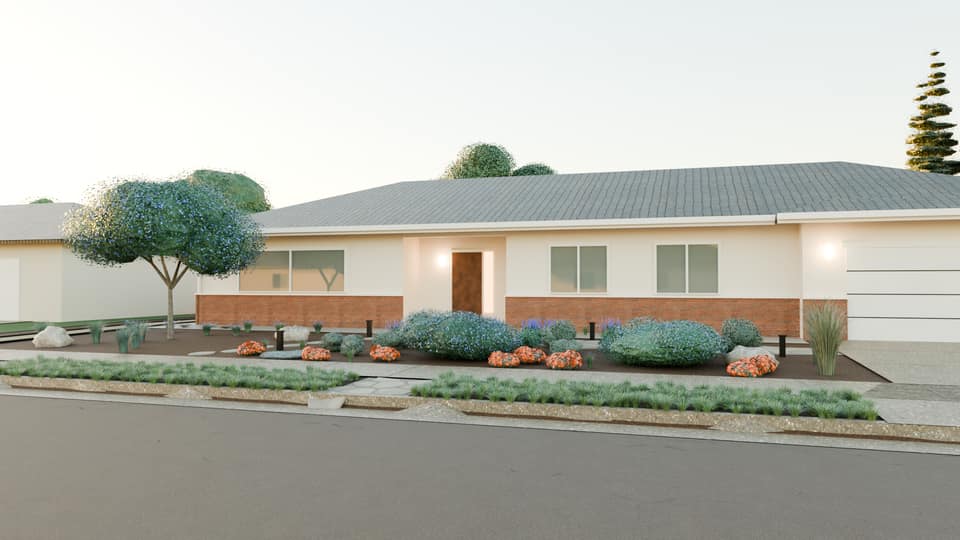 2
2The 3D model
Built from the plan’s own data: the same plants at their mature size, in the same places. Nothing moved, nothing added.
3D model · sample design 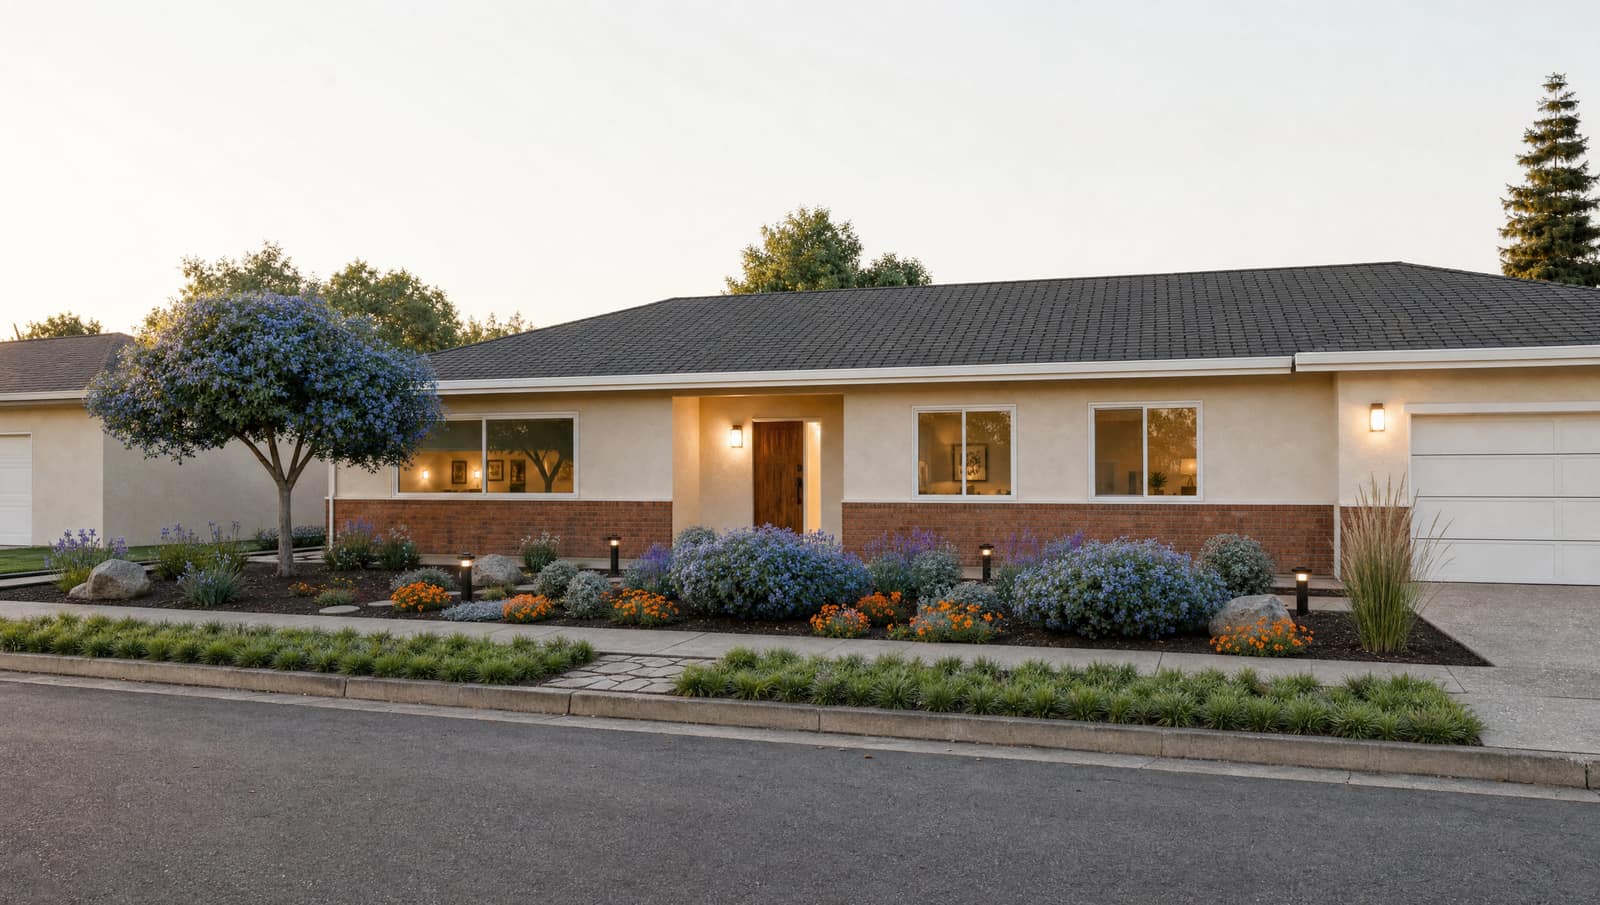 3
3The concept render
A finishing pass for light, texture and detail, keeping every plant where the plan puts it.
Concept render


Every image belowConcept render · sample design for illustration, not a client project · rendered from the sample plan above
Front and side yards

Front yard · from across the street

Front yard · the flagstone walk to the porch

Front yard · steppers up from the sidewalk

Front yard · at dusk, lights on

Front to back · the whole property from above

Side yard · the path to the side gate
Back yard

Back yard · the whole layout at golden hour

Back yard · from the patio

Back yard · from the bench

Back yard · at blue hour

Back yard · the nook under the oak

Back yard · the rain chain in a storm

Back yard · the dry creek running in winter rain
More sample concept renders
Six more styles: front yards, back yards, and one close-up. Each is a sample design, labeled as one, so you can see the kind of picture you’ll get of your own space.
Every image belowConcept render · sample design for illustration, not a client project

Back yard · flagstone patio, olive tree, built-in bench, fire bowl

Front yard · pollinator border: poppies, sage, yarrow, blue-eyed grass

Front yard · courtyard with manzanita, ferns, iris, stone seat wall

Front yard · gravel garden, olives, boulders, corten planters

Back yard · kitchen garden, corten beds, espaliered apples, Meyer lemon

Front yard · entry path under a coast live oak
Images labeled “concept render” are design illustrations, not photos of completed projects.
Your own renders show your own yard, from your photos or a site visit.
- Finished projects
- Shown here as they happen, with each homeowner’s permission
- Renders on this page
- Samples, each one labeled
From your yard to a planting plan
Drawn, not photographed: three sketches of the three stages every design goes through.
The yard today
Where every design starts: your photos, or what we see on a site visit.
The concept render
A picture of one possible direction for your space, drawn over your own yard.
The planting plan
Which plants go where, ready to take to the build.
The bridge to the yard you want.
Tell us about your yard and share a few photos if you have them. We'll reply by email with a written quote and next steps.
Requesting a quote is free. Prefer to talk it through? Call (206) 949-3519.